You can use tools such as bigdump to import large databases as phpmyadmin will only accept relatively small databases to import, but I prefer this on a localhost install as you already have easy access already and its quick and easy to do.
Download your database from your live site (if that's the one you want to use). Extract the .gz so you have just a .sql file.
For this example (remember yours will be different) , you need the following...
The root users name and password (for mysql) , its normally just "root" and no password.
The name of the new blank database (if you have not already created one, visit your localhost phpmyadmin and create a new blank database now)
Use windows explorer or a command prompt. Navigate your way to the folder where wamp is installed. You need to go into the folder where mysql.exe is. In my case it is D:\_DEV\bin\mysql\mysql5.1.30\bin . Most cases it will be c:\program files\wamp\bin\mysql\mysql version\bin etc...
Copy the .sql file into here. It must be in the same directory as mysql.exe
Open a command prompt in this directory if you have not already. If you have the "command prompt here" powertoy, this can be quicker than having to navigate via a command prompt to here. You can download this from Microsoft if you want it. Failing that, simply navigate your way to the appropriate directory using cd.
For this example, the database I am importing is called mybackup.sql and the new empty database I created is called test
Assuming you do NOT have a root password, type in the following...
mysql.exe -u root test < mybackup.sql
This may take a few minutes depending on the database size and your CPU power, your firewall may prompt you so you will have to allow temporary access (should only be mysql wanting localhost access)
When its finished, remove the mybackup.sql file you put in that directory.
Done :D
As an extra note, if you have a root password for mysql, you will need to use this instead (changing pass for the password)
mysql.exe -u root -p pass test < mybackup.sql
Wednesday, December 8, 2010
Sunday, October 3, 2010
Installing Windows XP using a single USB flash drive.
I had heard of installing Vista and even Windows 7 RC using a flash drive, but never XP (my operating system of choice). I spent some time researching and by combining a few things I learned on various sites, put together a method that was pretty quick and worked perfectly. I decided to make this guide (complete with clickable screenshots) for people like me who need a no-nonsense method of installing XP from a flash drive.
Before beginning, you need to make sure that the computer you plan to install Windows on can boot from USB. Check your BIOS or motherboard manual if you are unsure of this. You will also need a separate computer to prep the installation on the USB flash drive. You will need a flash drive at least 2 GB in size. Flash drives are extremely cheap so buying one shouldn't be a problem if you don't already have one this size or larger.
The first thing you need to do is download the three files below and save them on your desktop.
PeToUSB.zip
USBprep.zip
BOOTsect.zip
Once you have these downloaded, extract PeToUSB.zip and USBprep.zip separately. Then, copy everything from the PeToUSB folder to the USBprep folder. Now, copy the USBprep folder and place it in C:\
Also, extract BOOTsect.zip and put these files directly in the C:\ directory as well.
Next, you need to put your Windows CD in your optical drive and copy all of the contents from it over to a folder in the C:\ directory. I named mine "XP" so it would be easier to recall later.
Navigate to the USBprep folder in C:\ and double click the usb_prep8.cmd file (yours may or may not have the .cmd extension based on the Windows settings you are using. You can enable file extensions by clicking Tools, Folder Options, View tab, then unticking "Hide extensions for known file types" in the Advanced Settings list).


Prepping The Flash Drive
Clicking usb_prep8.cmd opens up the black and white command screen you see above. Follow the directions on-screen by clicking any button and you will be greeted with another window, PeToUSB. If you have your flash drive plugged in, the program should detect it and list it under the destination drive.
Click "Start" in the PeToUSB window, select "Yes" to continue then again click "Yes" when it asks if you are sure you want to repartition and format the disk. Once complete, click "Ok".
Leave all of these windows open and go to "Start", then "Run" and type in "cmd" to bring up the console window.
Type "cd c:\", without the quotes and press Enter.
Now type "bootsect /nt52 M:", without the quotes. In this example, "M" represents the letter of my flash drive. Yours will likely be different so be sure to check beforehand (it should be listed beside your device name in PeToUSB - if not there, simply double click My Computer on your desktop and locate the drive letter there.) then press Enter.
The command window will inform you that Bootcode was successfully updated on all target volumes.


Now, close out of the current command window and also close PeToUSB. Doing this will bring up a new set of options in the original command window, as seen above.
Press "1" then Enter and you will be asked to browse to the folder that you copied Windows to. Select the folder then click "OK".
Click back on the command window and press "2" then Enter. You will be asked to enter a drive letter that is not already taken. You may want to check in My Computer to be sure you select a letter that isn't already being used. In the screenshot above, I selected "O". Press Enter after selecting your drive letter of choice.
Press "3" then Enter and you will be asked for the drive letter of your flash drive. This is the same letter that you used earlier in bootsect. For me, that letter is "M". Input the letter and press Enter.
Finally, press "4" then Enter. You will be asked if you want to proceed with the format. Type "Y" then press Enter.
The system will pause a moment while the format takes place. Then you will be asked to press any key to continue... do so. This starts the first phase of the process which will take a few minutes.
Once again, you will be prompted to press any key to continue... do so. Another dialog box will pop up, asking you if you want to start the file copy. Click "Yes". The command window will again activate and start copying files to the flash drive which will take a few minutes.
After a bit, you will be asked if you would like USB-stick to be Preferred Boot Drive. Click "Yes".
Finally, a dialog box asks if you would like to unmount the Virtual Drive. Click "Yes".
That's it, you are done! You can close the command window and any other relevant windows that may still be open.
But, we are not done. Now comes time to install XP, which as you will find out, is a bit of a different process when using a flash drive. Continue ahead as we walk through this procedure.
Tuesday, August 24, 2010

Friday, August 20, 2010
Setting Inter VLAN on Mikrotik Router
VLANs based on the definition of independent logical networks within a physical network, as illustrated more easily may be similar but not equal to the distribution of the partition on the HDD.
Some advantages of VLANs, excerpted from http://en.wikipedia.org/wiki/VLAN;
* Increase the number of domain broadcast but reduces the size of each, which automatically reduces network traffic and improve safety.
* Reduce the need to create a subnetwork.
* Reducing the need for hardware, networks can be separated logically, not necessarily physically.
* Adding the control of various types trafiic.
* Create multiple logical does even in a logical switch.
Implementation is done by separating traffic on the wireless client connected using a Virtual Access Point in Access Point AP Mikrotik Router OS-based bridge. Access Router on my network also uses Mikrotik Router OS that then perform shaping and firewall.
Here's a summary of topology;


Wireless Client connected to each virtual AP with different SSID on an Access Point, which is used in this case is the RB-112 with Mikrotik Router OS v.2.9.35. Wireless Client A (Duren Sawit) also use the RB-112 with Station-WDS configuration, while the Wireless Client B (Cipinang) using Smart radio bridge (SB-2100) with the Infrastructure Client configuration.
In Access Point, create a virtual AP, vap1 and vap2 with the master interface wlan1, which each have a different SSID, but running on a single frequency.


Some advantages of VLANs, excerpted from http://en.wikipedia.org/wiki/VLAN;
* Increase the number of domain broadcast but reduces the size of each, which automatically reduces network traffic and improve safety.
* Reduce the need to create a subnetwork.
* Reducing the need for hardware, networks can be separated logically, not necessarily physically.
* Adding the control of various types trafiic.
* Create multiple logical does even in a logical switch.
Implementation is done by separating traffic on the wireless client connected using a Virtual Access Point in Access Point AP Mikrotik Router OS-based bridge. Access Router on my network also uses Mikrotik Router OS that then perform shaping and firewall.
Here's a summary of topology;
Wireless Client connected to each virtual AP with different SSID on an Access Point, which is used in this case is the RB-112 with Mikrotik Router OS v.2.9.35. Wireless Client A (Duren Sawit) also use the RB-112 with Station-WDS configuration, while the Wireless Client B (Cipinang) using Smart radio bridge (SB-2100) with the Infrastructure Client configuration.
In Access Point, create a virtual AP, vap1 and vap2 with the master interface wlan1, which each have a different SSID, but running on a single frequency.


Give the IP Address and Routing on the VLAN interface to be in governance


Wednesday, August 18, 2010
Install the Mikrotik OS using a CD
To install the RouterOS using a CD you will need a CD-writer and a blank CD. Burn the CD-image (an .iso file) to a CD. The archive with image can be downloaded here.
Follow the instructions to install RouterOS using CD-Install:
- After downloading the CD image from www.mikrotik.com you will have an ISO file on your computer:

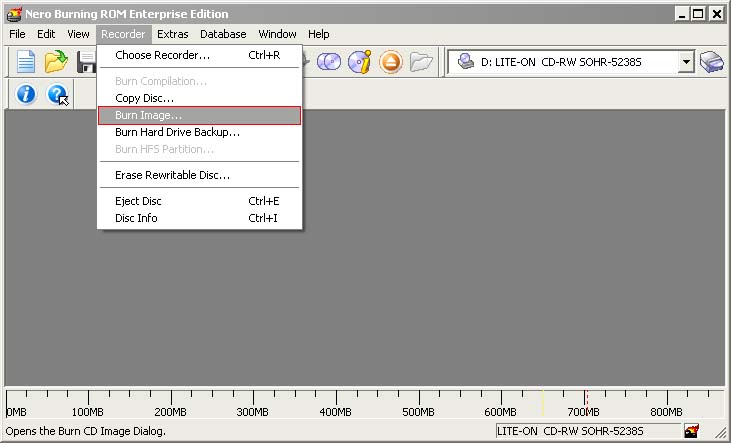
- Open a CD Writing software, like Ahead NERO as in this example:
- In the program, choose Burn Image entry from the Recorder menu (there should be similary named option in all major CD burning programs):
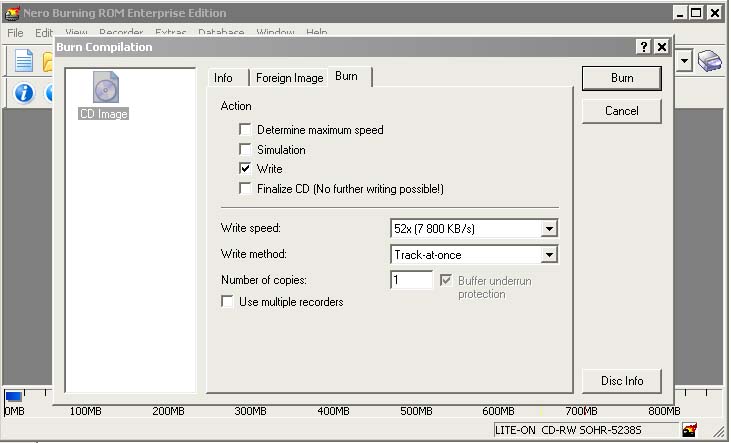
- Select the recently extracted ISO file and click Open:

- Finally, click Burn button:
- Set the first boot device to CDROM in router's BIOS.
-
After booting from CD you will see a menu where to choose packages to install:
                Welcome to MikroTik Router Software installation

Move around menu using 'p' and 'n' or arrow keys,
select with 'spacebar'.
Select all with 'a', minimum with 'm'. Press 'i' to install locallyor 'r' toinstall remote router or 'q' to cancel and reboot.
[X] system [ ] isdn [ ] synchronous
[X] ppp [ ] lcd [ ] telephony
[X] dhcp [ ] ntp [ ] ups
[X] advanced-tools [ ] radiolan [ ] web-proxy
[ ] arlan [ ] routerboard [ ] wireless
[ ] gps [X] routing
[ ] hotspot [X] security
-
Follow the instructions, select needed packages, and press 'i' to install the software.
-
You will be asked for 2 questions:
Warning: all data on the disk will be erased!

Continue? [y/n]
Press [Y] to continue or [N] to abort the installation.
Do you want to keep old configuration? [y/n]:
You should choose whether you want to keep old configuration (press [Y]) or to erase the configuration permanently (press [N]) and continue without saving it. For a fresh installation, press [N].
Creating partition...
Formatting disk...
The system will install selected packages. After that you will be prompted to press 'Enter'. Before doing that, remove the CD from your CD-Drive:
Software installed.
Press ENTER to reboot
Wednesday, July 14, 2010
Inistall Sierra MC8775 3G 3G card on Rb411 U Mikrotik

The RB411U is a versatile yet very small device. It includes all - a miniPCI slot, a USB 2.0 port and a miniPCI-E slot for connecting a 3G card. A SIM card slot for 3G is also present on
the RB411U.
RB411U includes RouterOS - the operating system, which can be a router, firewall, bandwidth manager, a mobile 3G router, and more - all at the same time.
You can use the USB port to attach a secondary storage device, or a USB 3G modem. The RB411U mounting holes are in the same location as other RB411 models, so you can easily mount it into any supported outdoor case/antenna.
RouterBOARD 411U with Atheros 300Mhz CPU, 32MB RAM, one LAN, one MiniPCI, one miniPCI express (for 3G), one USB port, one SIM slot, NAND Storage with RouterOS Level 4 (AP support)
Connect to router board
siamak@ubuntubox:~$ telnet 10.1.1.209
Trying  10.1.1.209...
Connected to 10.1.1.209.
Escape character is '^]'.

MikroTik v3.25
Login: admin
Password:


MMM      MMM       KKK                          TTTTTTTTTTT      KKK
MMMM    MMMM       KKK                          TTTTTTTTTTT      KKK
MMM MMMM MMM  III  KKK  KKK  RRRRRR     OOOOOO      TTT     III  KKK   KKK
MMM  MM  MMM  III  KKKKK     RRR  RRR  OOO  OOO     TTT      III  KKKKK
MMM      MMM  III  KKK KKK   RRRRRR    OOO  OOO      TTT     III  KKK KKK
MMM      MMM  III  KKK  KKK  RRR  RRR   OOOOOO      TTT     III  KKK   KKK

MikroTik RouterOS 3.25 (c)  1999-2009       http://www.mikrotik.com/


[admin@MikroTik] >
secret: admin/
Making ppp Profile:[admin@MikroTik] > ppp profile print Flags: * - default 0 * name="default" use-compression=default use-vj-compression=default use-encryption=default only-one=default change-tcp-mss=yes 1 name="maxis3g" use-compression=no use-vj-compression=no use-encryption=no only-one=default change-tcp-mss=default 2 * name="default-encryption" use-compression=default use-vj-compression=default use-encryption=yes only-one=default change-tcp-mss=yes [admin@MikroTik] > Configure the ppp connection
[admin@MikroTik] > interface ppp-client  print
Flags: X - disabled, R - running
0  R  name="maxis3g" max-mtu=1500 max-mru=1500 mrru=disabled port=usb2
   command-channel=0 data-channel=0 info-channel=0 user="maxis"
  password="wap" profile=maxis3g phone="*99***1#"  dial-command="ATDT"
  modem-init="AT+CGDCONT=1,"IP","net""  null-modem=no dial-on-demand=no
  add-default-route=yes  use-peer-dns=yes allow=pap,chap,mschap1,mschap2
[admin@MikroTik] >
Set the baud rate to 9600 for communicating with the modem, in case it's not done already:
[admin@MikroTik] > port set usb2 baud-rate=9600
Enable and Disable the Interface
[admin@MikroTik] > interface ppp-client enable maxis3g[admin@MikroTik] > interface ppp-client disable maxis3gCheck the available resource
[admin@MikroTik] > system resource usb print
# DEVICE VENDOR    NAME                                         SPEED
0 2:1              RB400  EHCI                                  480 Mbps
1  1:1              RB400 OHCI                                  12  Mbps
2 1:4    HP        HP hs2300 HSDPA Broadband Wireless Module   12  Mbps
[admin@MikroTik] >
[admin@MikroTik] > port print Flags: I - inactive # NAME CHANNELS USED-BY BAUD-RATE 0 serial0 1 Serial Console auto 1 usb2 3 PPP 9600 [admin@MikroTik] > check connection status:
[admin@MikroTik] > interface  ppp-client monitor maxis3g
 status: "connected"
 uptime:  49m30s
idle-time: 0s
    mtu: 1500
    mru: 1500
-- [Q quit|D dump|C-z pause]
check ip:
[admin@MikroTik] > ip address print Flags: X - disabled, I - invalid, D - dynamic # ADDRESS NETWORK BROADCAST INTERFACE 0 D 10.1.1.209/24 10.1.1.0 10.1.1.255 ether1 1 D 121.120.136.74/32 10.112.112.119 0.0.0.0 maxis3g [admin@MikroTik] > check routing:
[admin@MikroTik] > ip route print Flags: X - disabled, A - active, D - dynamic, C - connect, S - static, r - rip, b - bgp, o - ospf, m - mme, B - blackhole, U - unreachable, P - prohibit # DST-ADDRESS PREF-SRC G GATEWAY DISTANCE INTERFACE 0 ADS 0.0.0.0/0 r 10.1.1.3 0 ether1 1 DS 0.0.0.0/0 r 10.112.112.119 1 maxis3g 2 ADC 10.1.1.0/24 10.1.1.209 0 ether1 3 ADC 10.112.112.119/32 121.120.136.74 0 maxis3g [admin@MikroTik] > References
- http://wiki.mikrotik.com/wiki/
Hardware - Huawei 3G EVDO PCMCIA card
- Option Globetrotter HSDPA USB Modem
Saturday, July 10, 2010
Solving RadiusManager Web Interface
I asked Fausi: After following the installation manual, the admin.php page still showing blank page instead of the login page. Why is that?
His Answer: I'm not a wizard to magically answer your problem... let me check your server.
After checking the server here is some information...
The linux:
[root@localhost html]# uname -a
Linux localhost.localdomain 2.6.27.5-117.fc10.i686 #1 SMP
Tue Nov 18 12:19:59 EST 2008 i686 i686 i386 GNU/Linux
I try to see what is happening in the /var/log/httpd/access_log...
XX.XX.XX.XXX - - [18/Jun/2011:23:12:03 +0800]
"GET /radiusmanager/admin.php HTTP/1.1" 500 - "-" "Mozilla/5.0
(X11; U; Linux i686; en-US; rv:1.9.0.19)Gecko/2010040118
 Ubuntu/8.10 (intrepid) Firefox/3.0.19"
so, I can see it is getting 500 error... seems like the server is misconfigured or something.
This RadiusManager is using ionCube to encode the page. Therefore, I think the httpd server haven't configured to use enough memory to parse the file.
What I do to fix this is simply edit the
/etc/httpd/conf.d/php.conf and add this line at the bottom...php_value memory_limit 500M
save the file and restart the httpd server:
[root@localhost html]# service httpd restart

Now, I can see the RadiusManager page. That's all Siamak. Have fun using linux!
Subscribe to:
Posts (Atom)